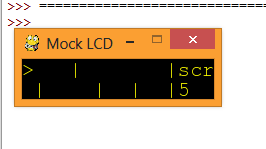
You've always wanted to make a game , but were too perplexed where to start ? maybe you think you don't have the right tools or the knowledge to make a game ? well , i'll be honest , making a game is no simple task, but, its not impossible, i will divide the process into a series so that its digestible.
Through this series, we will see how to make a simple game for a 16x2 lcd screen and at the end of the series we will try to make an expanded version of the game for a pc or a bigger lcd display,we will not be going into the details of interfacing a lcd with your raspberry pi in this series, we will begin right on with the game, because that's the fun bit.
By the end of this series, your game will look (somewhat )like this:
By the end of this series, your game will look (somewhat )like this:
Downloads
Before we begin you need to set up your programming environment, we will be working with python,and some of its modules , download them and follow the installation instructions by the respective provider to install them on your system.
- Python 2.7.x - Python 3 may not be compatible, be sure to get 2.7.x
- Pygame - Install Pygame appropriate to your system for python 2.7
- mlcd - Download the module from Github link at the bottom of the page.
Prepare your working folder
- At a convenient location , on your computer, make a folder named "MyPygame"
this is the folder that will contain all our working files for this game. - Copy the mlcd module's folder in this directory , so that the module is accessible to our game.
- Create a file "Cgame_part1.py" , this is the file that will have all our game logic.
Now that we have downloaded all the dependencies and prepared our working folder,we can look into starting the work with our game.
The game is a simple obstacle avoidance game.we keep our ship in one of the two lanes on the screen, the randomly generated obstacles show up and the player needs to switch the lanes in time before they hit an obstacle,or it's "game over"
simple enough, right? perfect for a beginner or as a weekend project !.
Edit:Head over to the next part in this series , where we see the basic input and output of the game laid out.

Comments
Post a Comment